Test Your Observation Skills – Personality Insight!
This fun visual test reveals insights based on the number of triangles you can spot. Take a moment and count how many triangles are in the image. The number you see says something about your personality!
Here’s What Your Answer Says About You:
If you saw 7 triangles: You are a perfectionist, attentive to detail, and like things to be in order. You have a strong sense of responsibility and strive to achieve your goals with precision.
If you saw 8 triangles: You have a balanced personality. You are adaptable and know how to handle different situations. You enjoy life and go with the flow, while still being focused on your objectives.
If you saw 9 triangles: You are a creative and open-minded thinker. You tend to think outside the box, and you enjoy exploring new ideas and perspectives. Your curiosity leads you to find unique solutions.
Now, for the recipe:
Ingredients for an Observation-Themed Dessert:
1 pack of chocolate triangles (like the ones shown)
Whipped cream or yogurt (for a creative twist)
Fresh fruit (optional for garnish)
Instructions:
Layer the Chocolate: Arrange the chocolate triangles in a creative pattern on a plate.
Add Whipped Cream: Add a dollop of whipped cream or yogurt between the triangles.
Garnish: Top with fresh fruits for a touch of sweetness and creativity.
Enjoy: Share this fun dessert with friends while testing their observation skills!
Now you can enjoy a treat while discovering more about yourself!
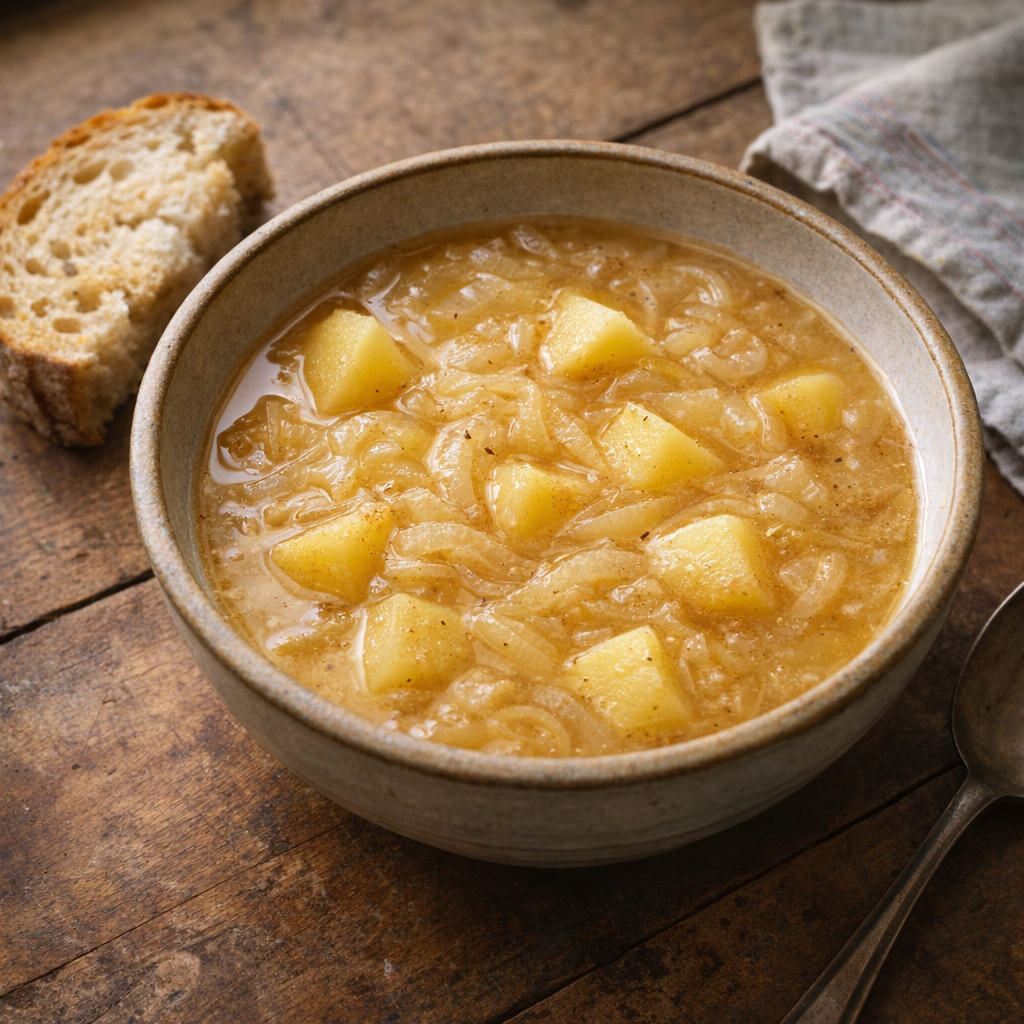
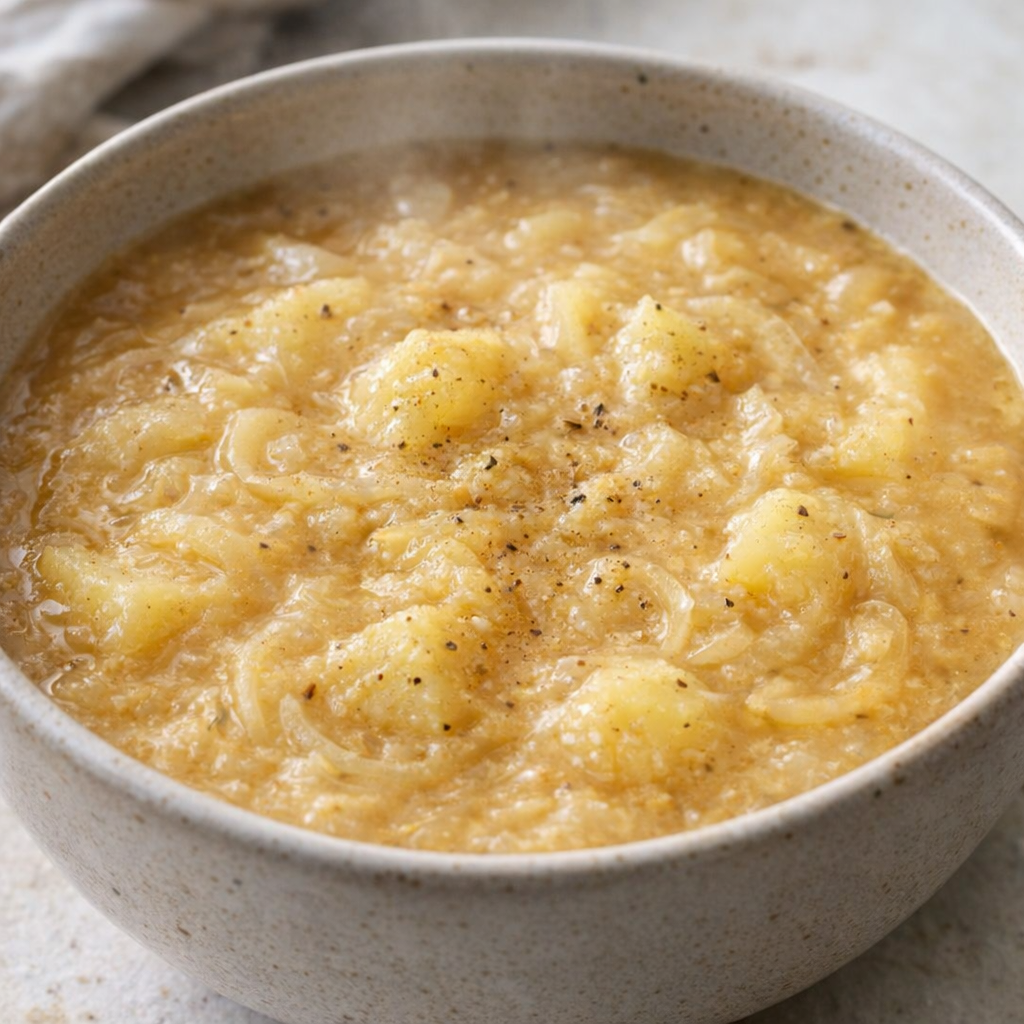
This slow cooker 3-ingredient onion and potato soup is the kind of humble, filling meal my grandpa swore by during the lean years. Back in the Depression, folks around here had to stretch every penny, and a sack of potatoes, a few onions, and a bit of fat or broth could keep a family going.
This version leans on time and gentle heat to coax deep, rich flavor out of almost nothing. The onions slowly caramelize in their own juices, the potatoes turn tender and creamy, and the broth takes on a golden color and a silky, slightly thickened texture. It’s simple, honest food that fills you up and warms you clear through without asking much from your pantry or your wallet.
Rustic bowl of onion and potato soup on a farmhouse table
Ladle this soup into sturdy bowls and serve it with thick slices of crusty bread or simple buttered toast for dipping into the rich broth. A crisp side salad of whatever greens you have on hand adds a bit of freshness, but it’s not required; this soup stands on its own as a full meal, especially on cold evenings.
If you like, offer a little black pepper at the table for those who want more bite, but otherwise let the pure flavors of onion, potato, and broth shine the way our grandparents enjoyed them.
Slow Cooker 3-Ingredient Onion and Potato Soup
Servings: 4
Ingredients
3 large yellow onions, thinly sliced
4 large russet potatoes, peeled and cut into hearty chunks
6 cups beef broth
Directions
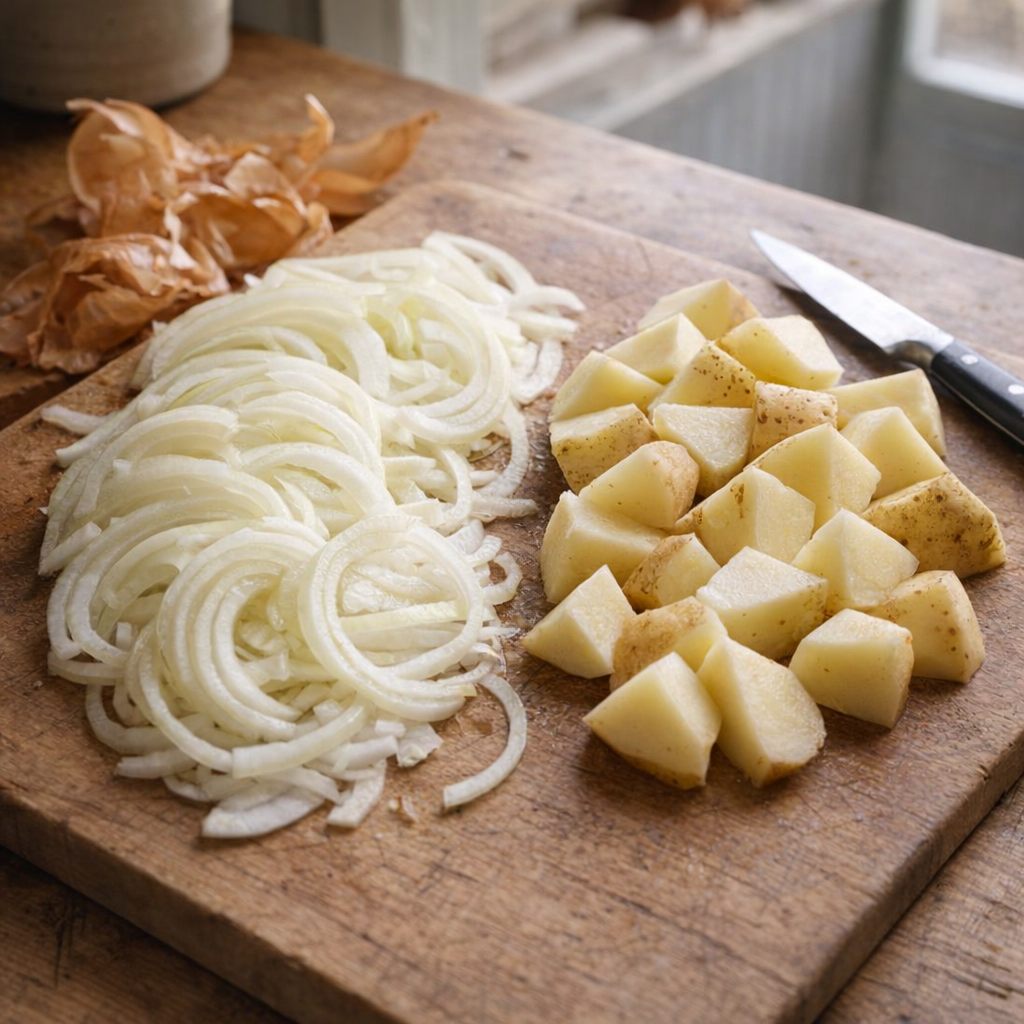
Peel the onions, then slice them thinly from root to tip so you end up with long, even slices. This helps them soften and caramelize gently in the slow cooker.
Sliced onions and peeled potatoes on a wooden cutting board
Peel the russet potatoes and cut them into rustic chunks about 1 to 1 1/2 inches in size. You want them big enough to hold their shape but small enough to get tender all the way through.
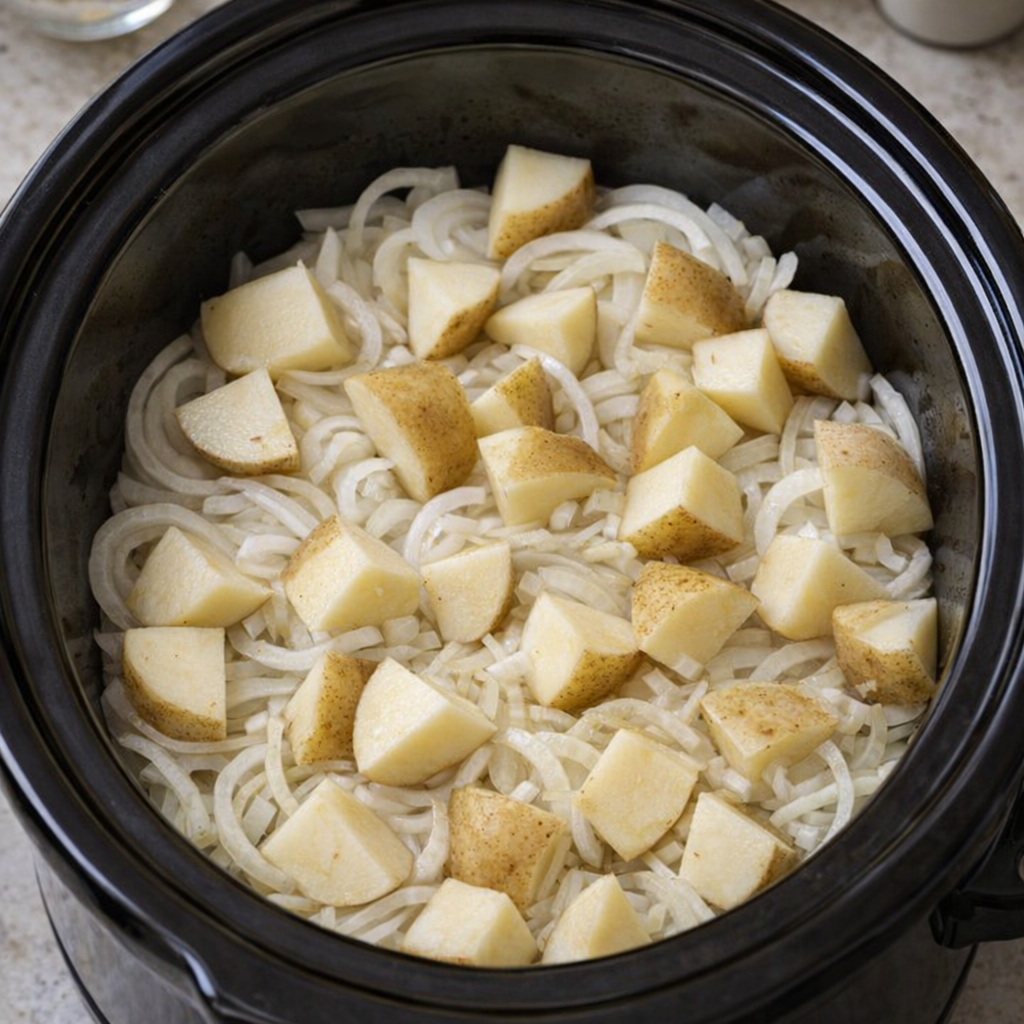
Scatter the sliced onions evenly over the bottom of a large slow cooker. This creates a soft, sweet base as they cook down and release their juices.
Layer the potato chunks on top of the onions in an even layer, without packing them too tightly. This lets the broth move around and cook everything evenly.
Slow cooker filled with onions and potatoes before broth is added
Pour the beef broth over the onions and potatoes, making sure the vegetables are mostly submerged. Gently press down with the back of a spoon to settle everything into the liquid, but do not stir too vigorously.
Cover the slow cooker with the lid and cook on LOW for 8 to 10 hours, or on HIGH for 4 to 5 hours, until the onions are very soft and golden and the potatoes are tender when pierced with a fork.
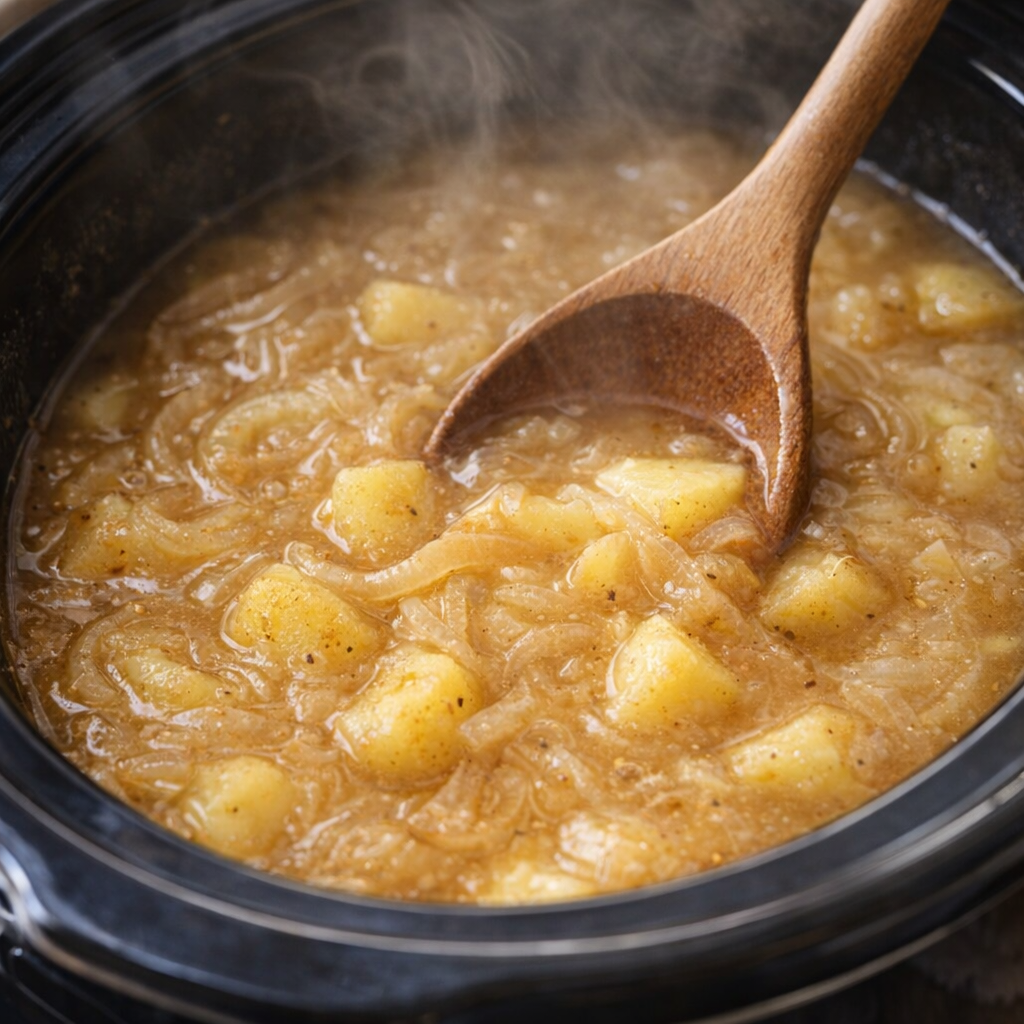
Once the cooking time is up, gently stir the soup from the bottom to lift the soft, caramelized onions through the broth. Some of the potatoes will break up a bit, naturally thickening the soup and giving it that slightly creamy, hearty texture.
Freshly cooked onion and potato soup being stirred in the slow cooker
Taste the broth and, if desired, adjust the seasoning at the table with a pinch of salt or black pepper, but keep in mind that the whole spirit of this dish is its simplicity. Ladle the hot soup into bowls, making sure each serving gets plenty of both onions and potato chunks along with the rich golden broth, and serve steaming from the slow cooker.
Variations & Tips
If you’d like to stay true to the three-ingredient spirit while nudging the flavor a bit, you can switch the type of broth: chicken broth will make a gentler, lighter soup, while vegetable broth keeps it meatless but still hearty. For a slightly thicker, creamier texture without adding new ingredients, use a potato masher to gently crush some of the cooked potatoes right in the slow cooker; this will release more starch and give the broth a velvety feel.
Bowl of thicker mashed-style onion and potato soup
If your onions are very sharp, you can slice them a little thicker so they hold up longer and turn mellow and sweet as they cook. To stretch the soup for more people, simply add another potato and a bit more broth, keeping the same basic balance. Leftovers keep well in the refrigerator for a few days and actually deepen in flavor; reheat gently on the stove or in the slow cooker with a splash of water or broth if it’s become too thick.
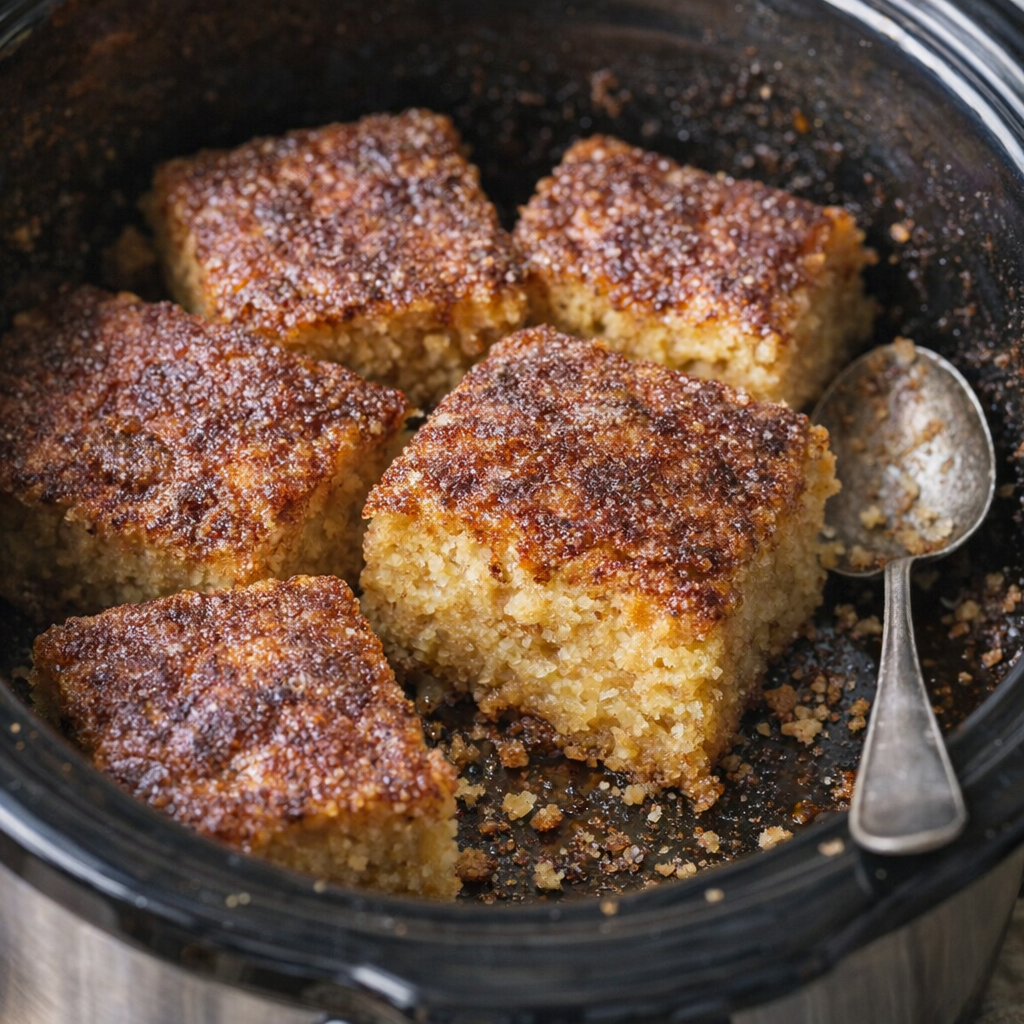
This 4-ingredient slow cooker snickerdoodle bar recipe is my quiet little April comfort—something I throw together when I want the house to smell like a bakery while I’m busy prepping Sunday dinner. It leans on a simple cake mix shortcut, but the long, gentle heat of the slow cooker gives you a soft, chewy interior and a glistening caramelized cinnamon-sugar crust that feels like an old-fashioned snickerdoodle cookie bar.
Slow cooker snickerdoodle bars served warm in the crock
It’s the kind of hands-off dessert that makes family meals feel special without adding more work to your plate.
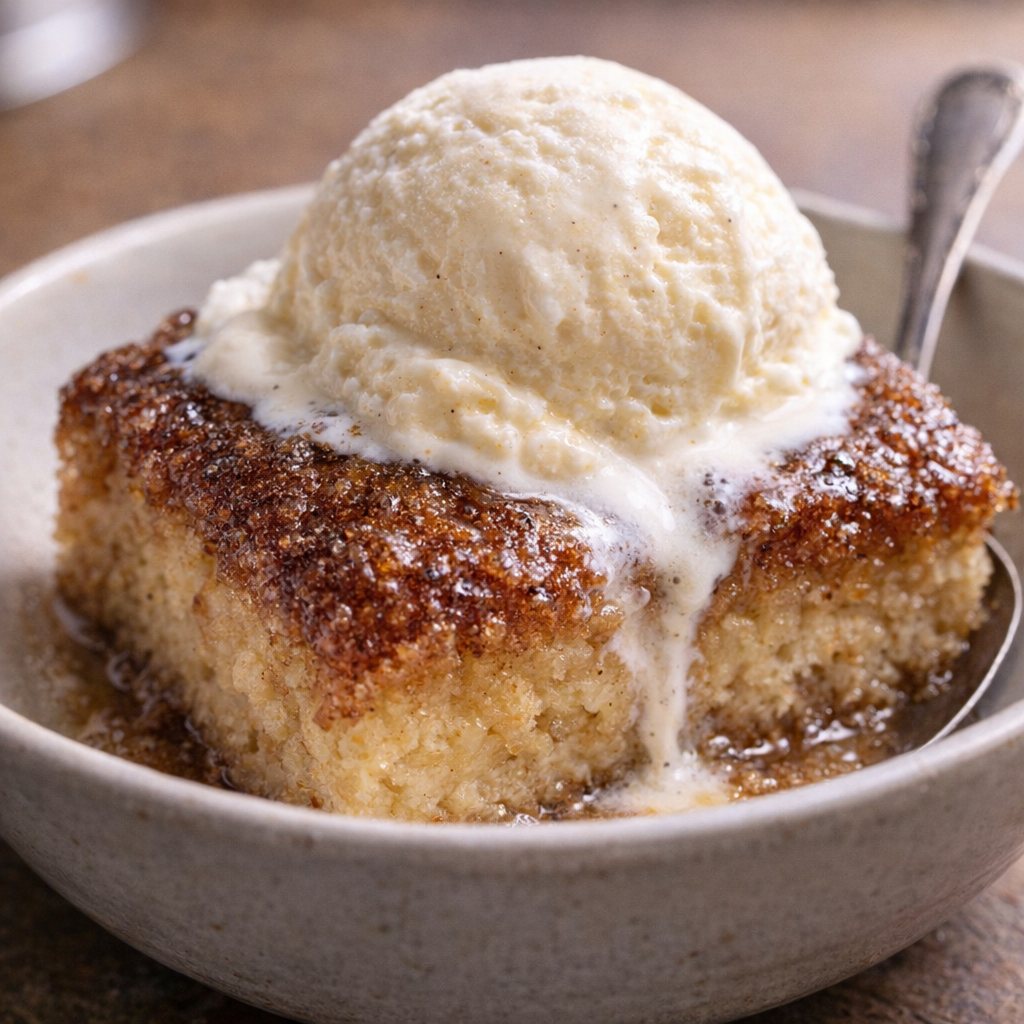
Let the bars cool slightly in the slow cooker, then cut into squares or scoop into bowls. These are wonderful served warm with a scoop of vanilla ice cream or a dollop of whipped cream so it melts into the chewy, golden interior. A cup of coffee, hot cocoa, or cold milk makes a cozy pairing.
Snickerdoodle bar topped with melting vanilla ice cream
If you’re serving Sunday dinner, I like to keep the main meal simple—roast chicken, mashed potatoes, and a green vegetable—then bring out these bars still in the slow cooker so everyone can see that caramelized crust and help themselves.
4-Ingredient Slow Cooker Snickerdoodle Bars
Servings: 8-10
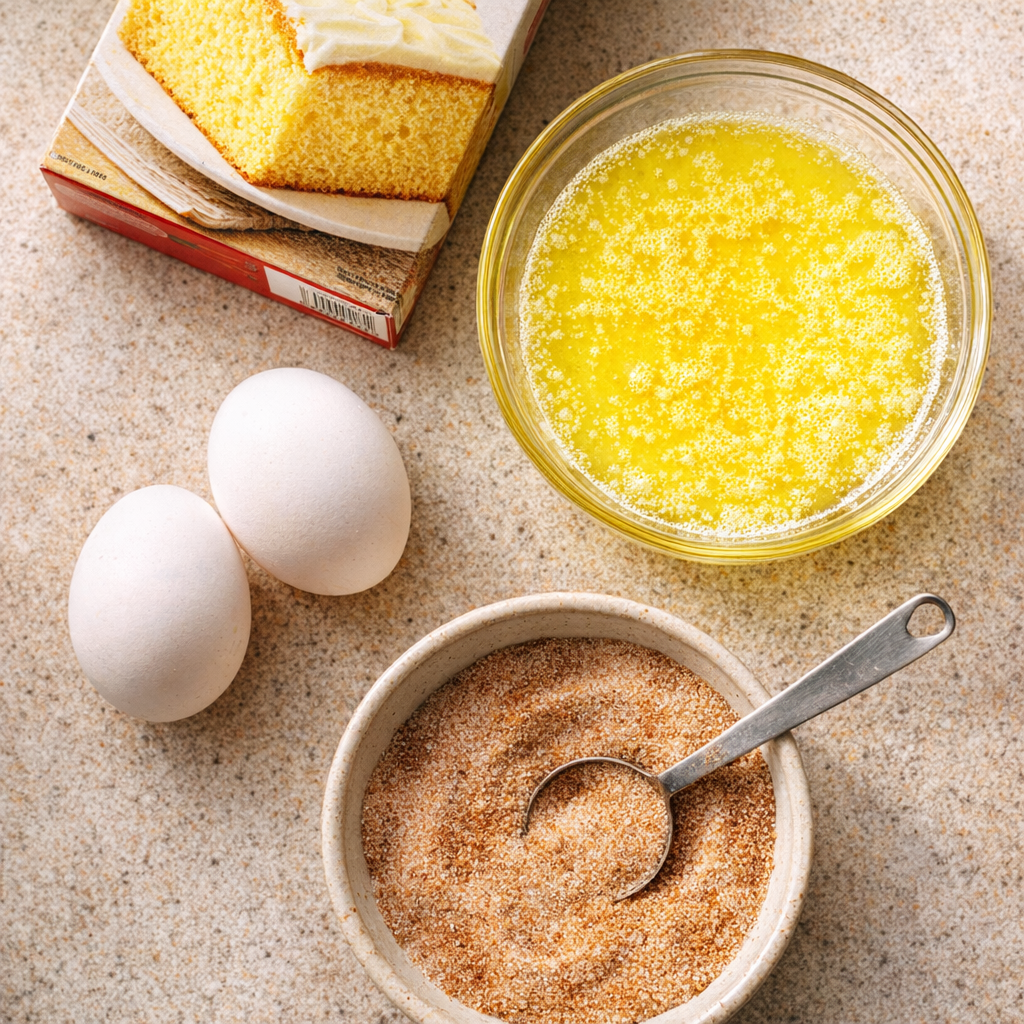
Ingredients
1 box (15.25 oz) yellow cake mix
1/2 cup (1 stick) unsalted butter, melted and slightly cooled
2 large eggs
1/3 cup granulated sugar mixed with 1 tablespoon ground cinnamon (for topping and lining)
Simple snickerdoodle bar ingredients on a kitchen counter
Directions
Lightly grease the insert of a 4- to 6-quart slow cooker with butter or nonstick spray. This helps the bars release easily and encourages that caramelized edge.
Sprinkle 2 to 3 tablespoons of the cinnamon-sugar mixture evenly over the bottom and about 1 inch up the sides of the greased slow cooker insert. This creates a flavored “crust” that will turn glistening and caramelized as it cooks.
Cinnamon sugar coating the inside of a slow cooker insert
In a medium mixing bowl, whisk together the melted butter and eggs until smooth and glossy.
Add the dry yellow cake mix to the bowl and stir with a spatula or wooden spoon until a thick, smooth batter forms. It will be quite dense—keep stirring until no dry pockets of mix remain.
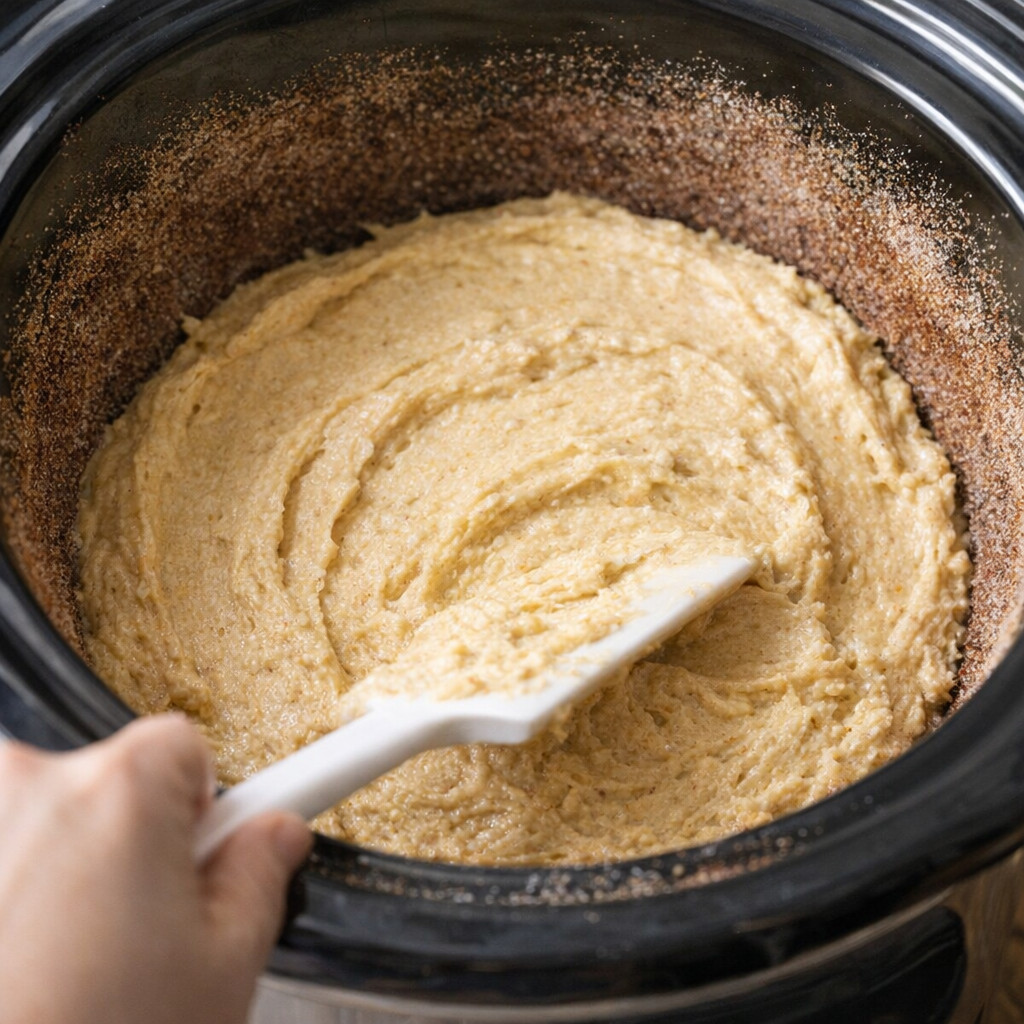
Spoon the batter into the prepared slow cooker insert. Use a spatula to spread it into an even layer, gently pressing it toward the cinnamon-sugar–coated sides.
Thick snickerdoodle batter being spread in the slow cooker
Sprinkle the remaining cinnamon-sugar mixture evenly over the top of the batter, covering it from edge to edge. This is what will form the glistening caramelized crust on top.
Cover the slow cooker with a clean kitchen towel, then place the lid on top of the towel. The towel catches condensation so the top of the bars can set and caramelize instead of getting soggy.
Slow cooker covered with a kitchen towel under the lid
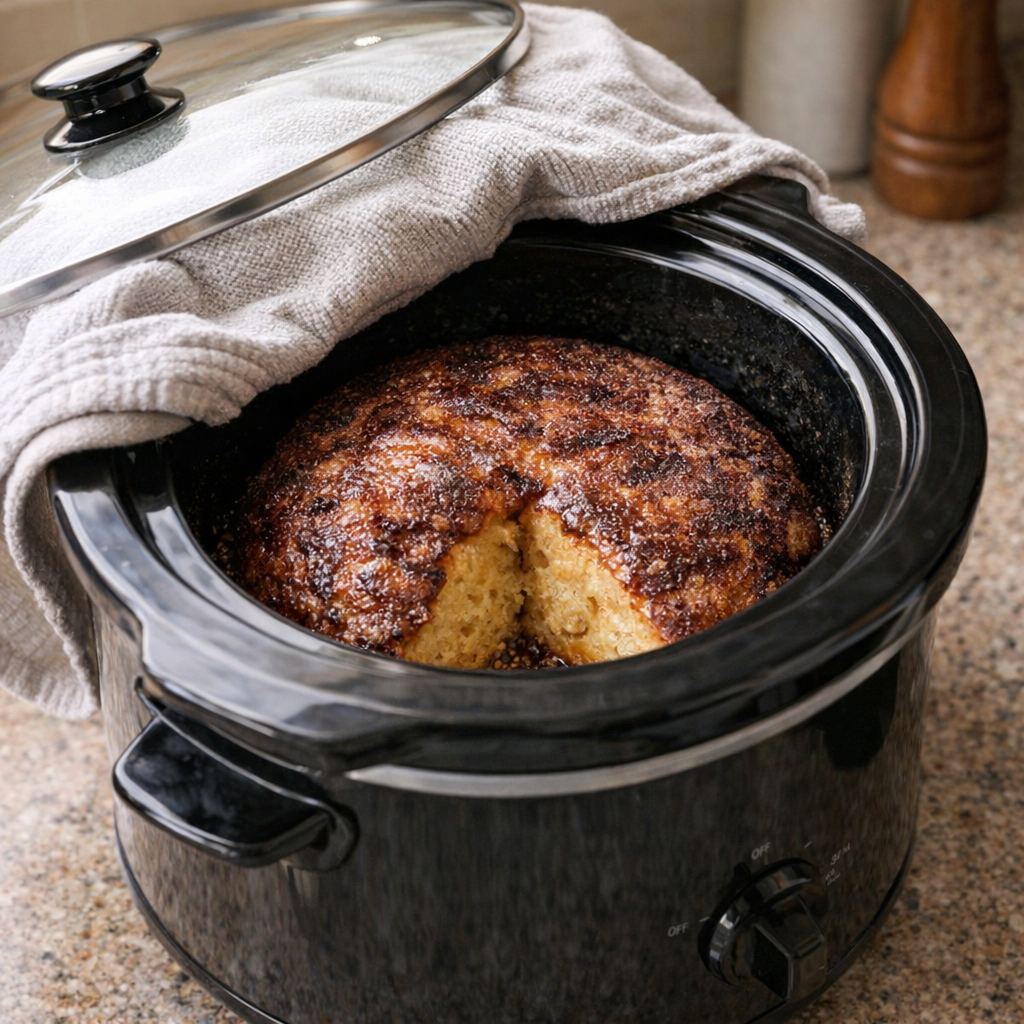
Cook on LOW for 2 to 3 hours, or until the edges are deeply golden and caramelized and the center is just set but still soft when lightly pressed. Every slow cooker runs a bit differently, so begin checking around the 2-hour mark. Avoid lifting the lid too often so you don’t lose heat.
Once done, turn off the slow cooker and let the bars rest, covered, for 15 to 20 minutes. This helps the chewy interior finish setting while keeping that glossy, crackly cinnamon-sugar top intact.
Run a thin spatula or butter knife around the edge to loosen. You can cut the bars directly in the slow cooker, or lift them out in sections using a wide spatula. Serve warm for the best texture, enjoying the contrast between the caramelized crust and the soft, golden interior.
Freshly cooked snickerdoodle bars with a crackly cinnamon top
Variations & Tips
For picky eaters who don’t love a strong cinnamon flavor, cut the cinnamon in half and replace some of the topping sugar with plain granulated sugar to keep the crust sweet but milder. If you prefer a deeper, almost toffee-like flavor, swap half of the granulated sugar for light brown sugar in the cinnamon-sugar mixture.
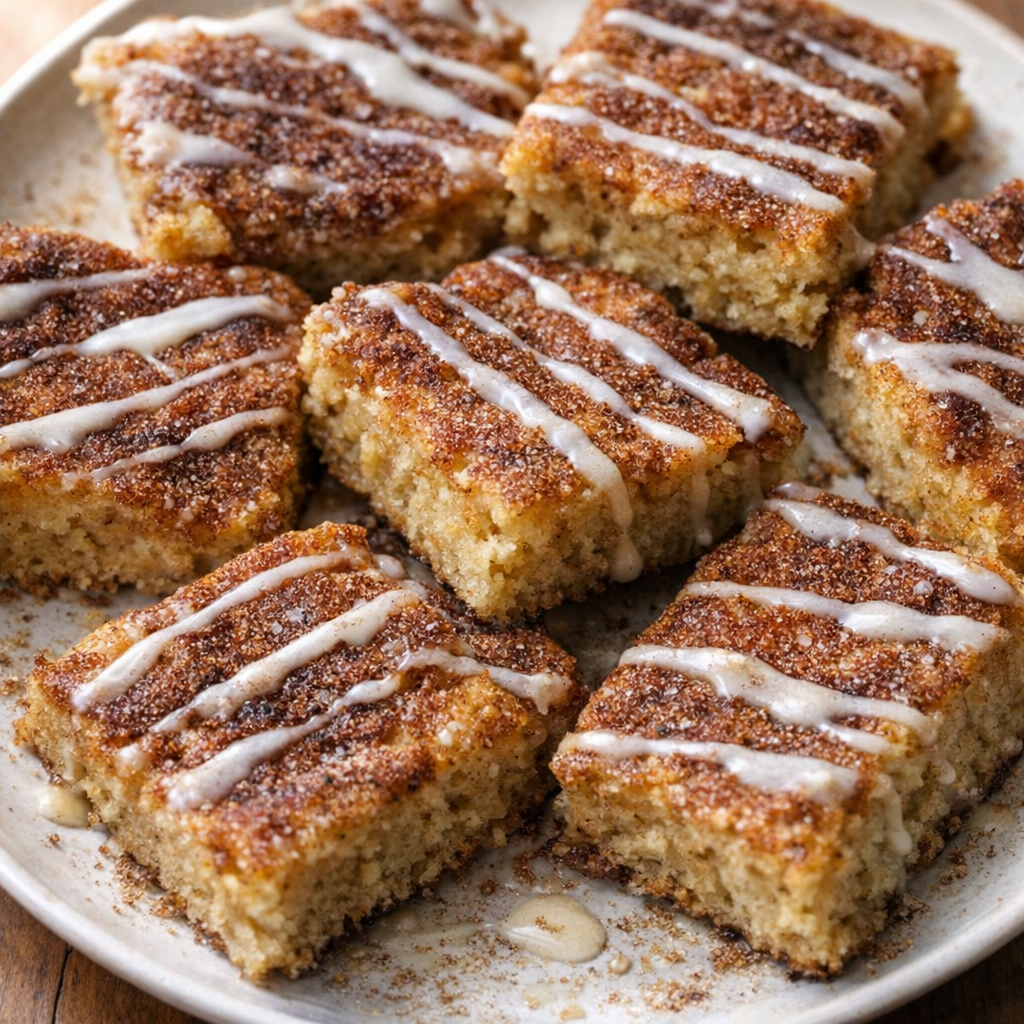
For a slightly richer, more custardy interior, stir in 1 teaspoon of vanilla extract with the butter and eggs. To dress this up for company, drizzle the cooled bars with a simple glaze (powdered sugar plus a splash of milk and vanilla) or a thin caramel sauce just before serving.
Snickerdoodle bars drizzled with glaze on a serving plate
You can also turn this into a fun sundae bar: keep the snickerdoodle bars warm in the slow cooker on the “keep warm” setting and set out bowls with ice cream, whipped cream, and a few toppings so everyone can build their own dessert. If you’re short on time, you can cook on HIGH for about 1 1/2 to 2 hours, but watch closely near the end so the crust caramelizes without burning.
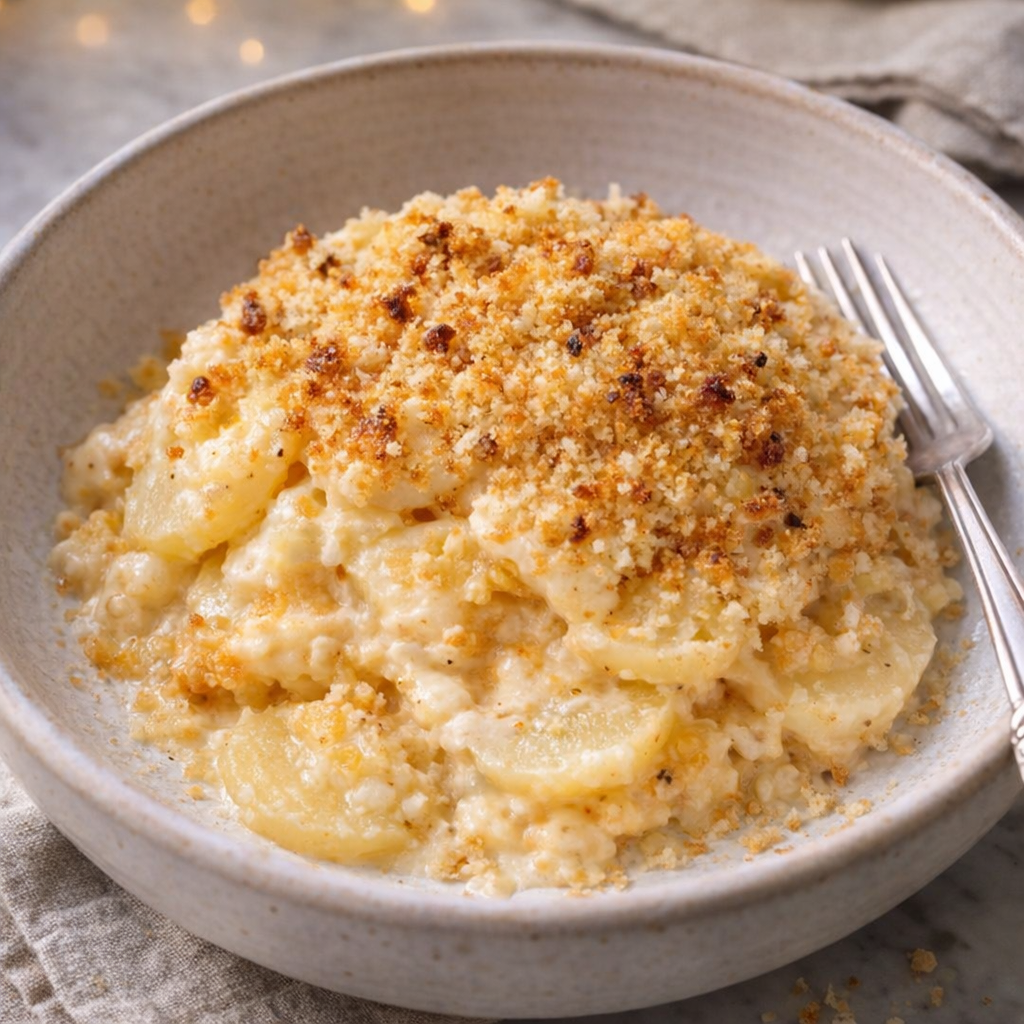
This 4-ingredient slow cooker creamy potato bake is exactly the kind of dish that quietly steals the show at a holiday table. I first brought it to an Easter gathering as a low-stress side, and it disappeared so fast that my sister-in-law cornered me in the kitchen to beg for the recipe.
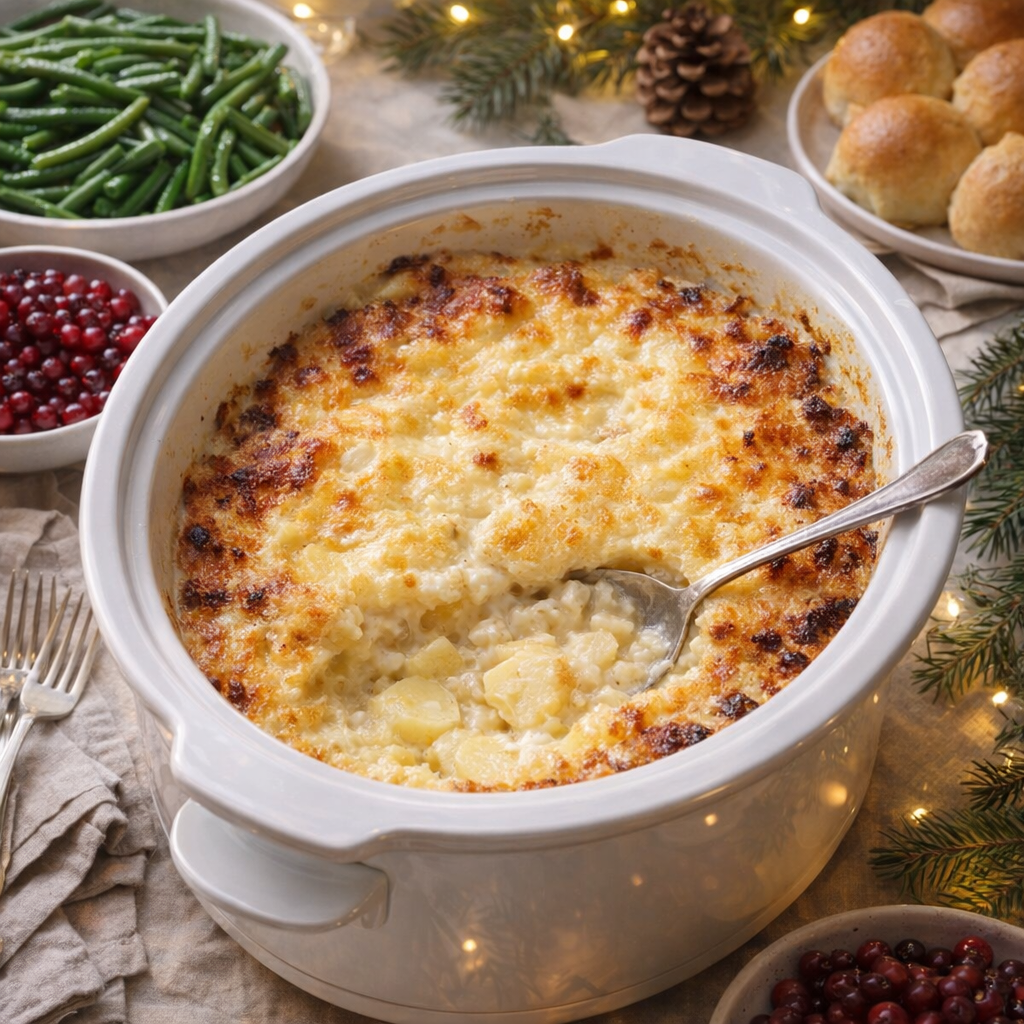
Creamy potato bake served from a slow cooker on a holiday table
It leans on frozen diced hash browns and a simple cream mixture to create a rich, velvety casserole with almost no effort. Everything bakes together low and slow in the slow cooker, so you get that golden, bubbling, creamy center with practically zero hands-on time—perfect when the oven is already busy with ham and rolls.
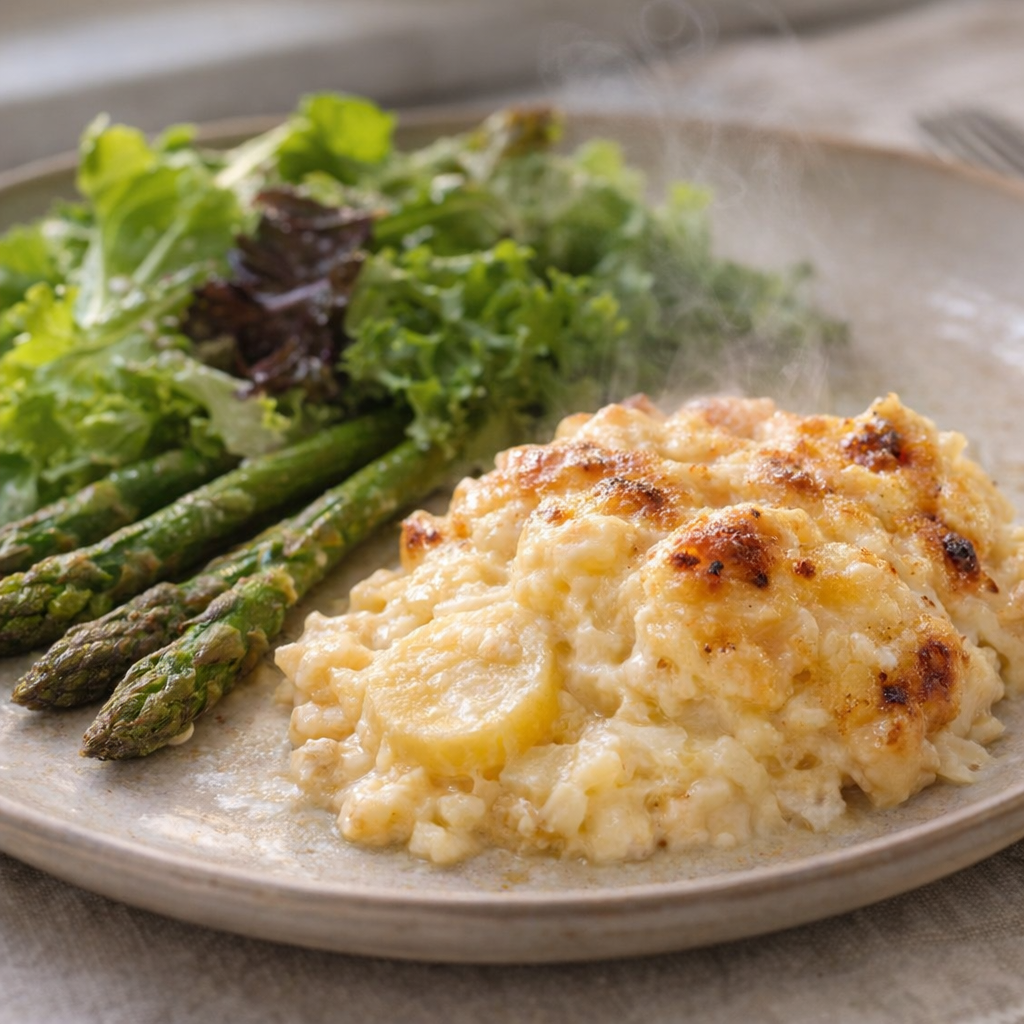
Serve this creamy potato bake straight from the slow cooker on its warm setting, spooned alongside baked ham, roasted turkey, or a simple roast chicken. It’s especially good with something bright and acidic on the plate—think a crisp green salad with a tangy vinaigrette, steamed green beans with lemon, or roasted asparagus.
Plated serving of creamy potato bake with green vegetables
For brunch, pair it with scrambled eggs, fruit salad, and a simple green salad. A sharp, zippy condiment like grainy mustard or pickled vegetables on the table helps balance the richness.
4-Ingredient Slow Cooker Creamy Potato Bake
Servings: 8-10
Ingredients
2 pounds frozen diced hash brown potatoes (about 1 large bag, unthawed)
2 cups heavy cream
2 teaspoons kosher salt
1 1/2 teaspoons garlic powder
2 cups shredded sharp cheddar cheese, divided
Directions
Lightly grease a large oval slow cooker (5- to 7-quart) with nonstick spray or a thin film of butter to help prevent sticking and promote those golden edges.
Slow cooker insert lightly greased and ready for casserole
In a large mixing bowl, whisk together the heavy cream, kosher salt, and garlic powder until the seasoning is evenly distributed throughout the cream.
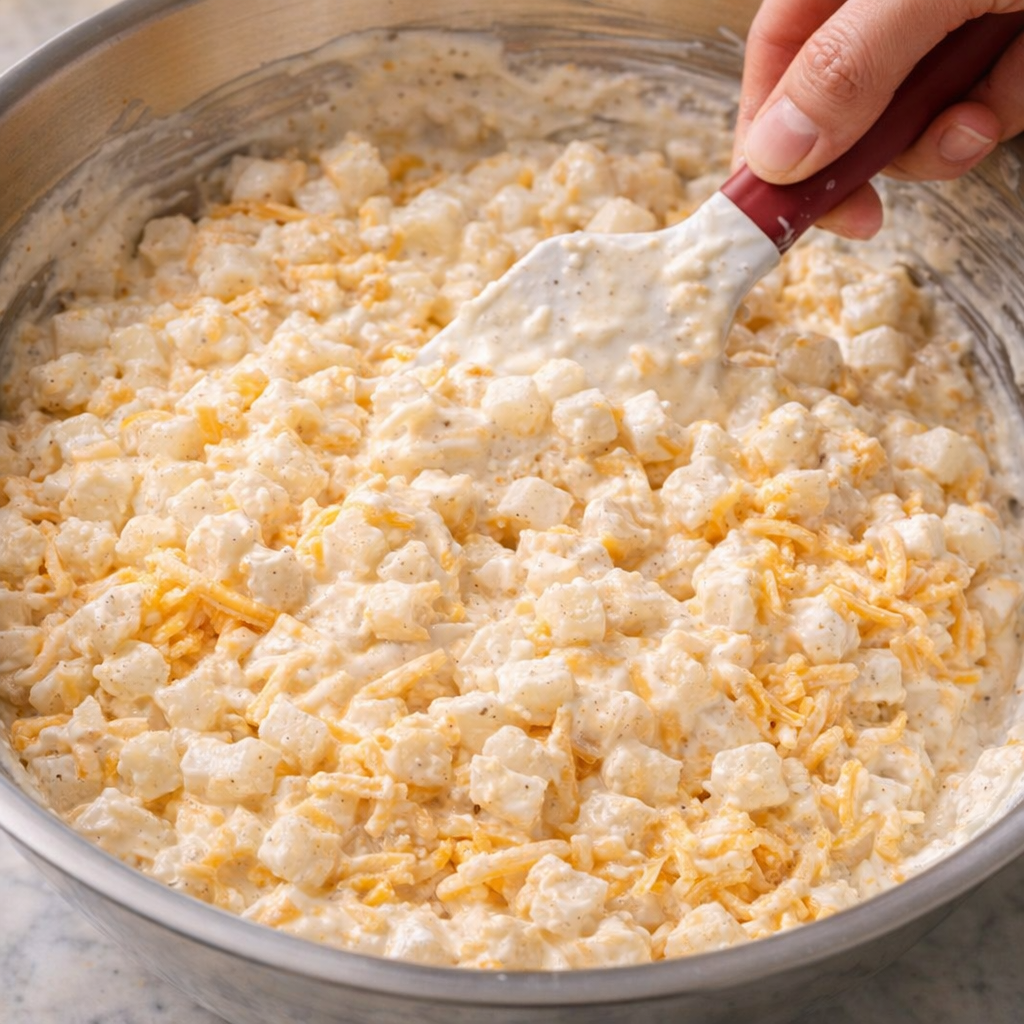
Add the frozen diced hash brown potatoes to the bowl (no need to thaw) and 1 1/2 cups of the shredded cheddar cheese. Toss gently with a spatula until all the potatoes are well coated in the creamy mixture and the cheese is evenly dispersed.
Hash browns and cheddar being mixed with seasoned cream
Transfer the potato mixture to the prepared slow cooker, spreading it into an even layer and smoothing the top lightly with the back of a spoon.
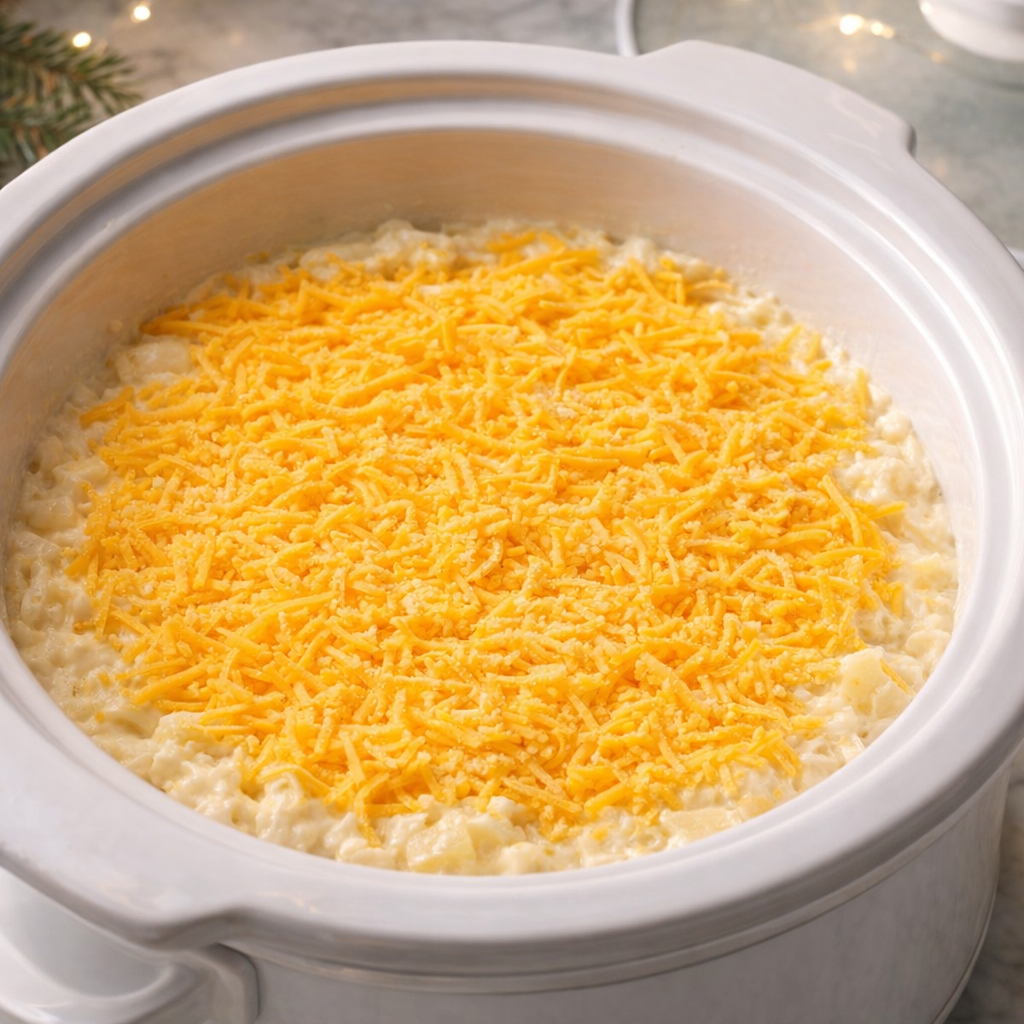
Sprinkle the remaining 1/2 cup shredded cheddar cheese evenly over the surface. This will create that golden, bubbling top you’re after.
Cover the slow cooker with the lid and cook on LOW for 4 to 5 hours, or until the potatoes are very tender when pierced with a fork and the edges are bubbling and lightly browned. Avoid lifting the lid during the first 3 hours so the casserole can set and stay creamy.
Cheddar-topped potato casserole ready to cook in slow cooker
If you’d like a deeper golden top and your slow cooker has a “bake” or “brown” function, use it for the last 15 to 20 minutes. Otherwise, simply let it continue on LOW until the cheese is melted and the edges are lightly caramelized.
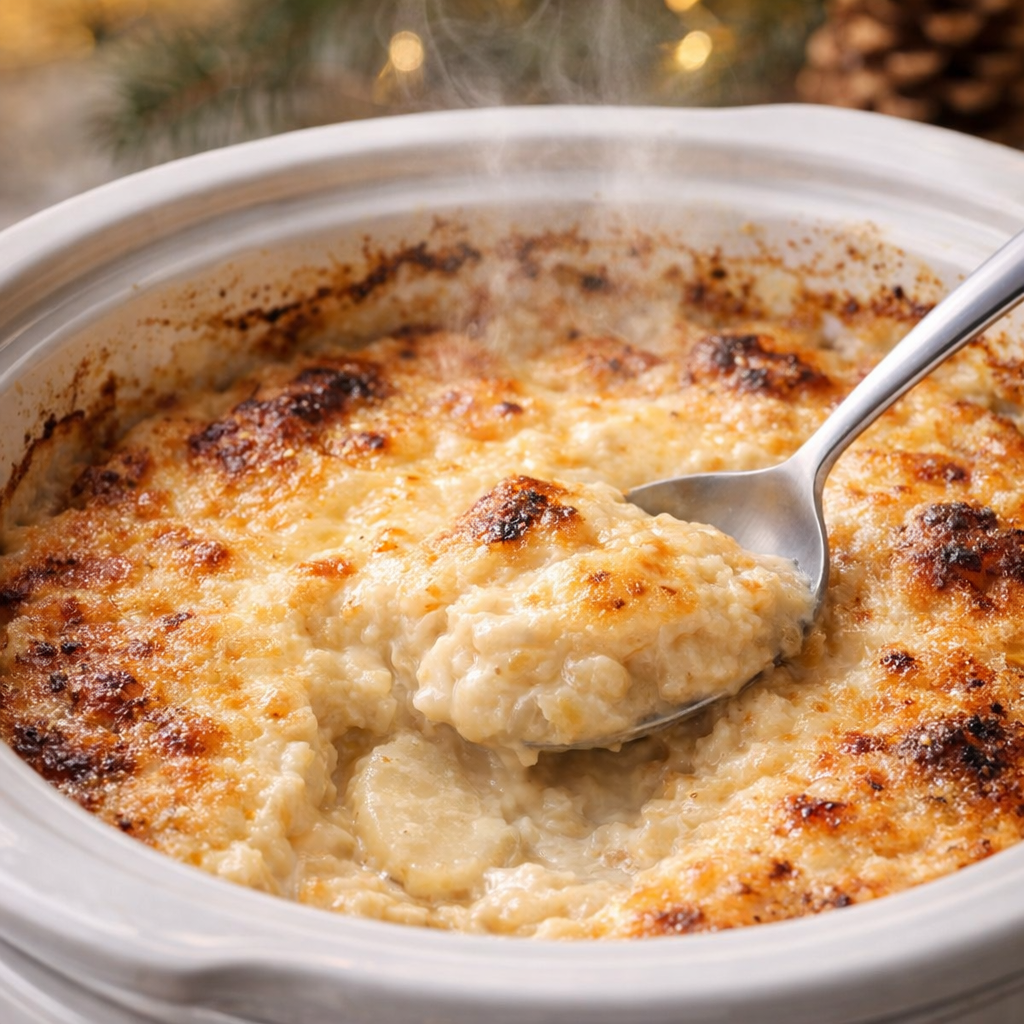
Once done, switch the slow cooker to WARM. Let the casserole rest, covered, for 10 to 15 minutes to thicken slightly before serving. Serve straight from the slow cooker, scooping down through the creamy center to show off the bubbling cheese and tender potatoes.
Variations & Tips
For a slightly lighter version, you can swap half of the heavy cream for whole milk or half-and-half; the casserole will still be creamy, just a bit less rich. If you prefer a more savory edge, add 1 teaspoon of onion powder or a pinch of smoked paprika to the cream mixture.
Freshly cooked potato bake with bubbling golden top
For cheese lovers, mix in a blend of cheeses—try half sharp cheddar and half Gruyère or Monterey Jack for extra melt and flavor. To make it more substantial for a brunch main, fold in 1 to 1 1/2 cups of diced cooked ham before transferring the mixture to the slow cooker.
If you like a bit of texture contrast, sprinkle the finished casserole with finely crushed buttery crackers or toasted panko just before serving (add them at the end so they don’t get soggy in the slow cooker). For those cooking ahead, you can toss the potatoes with the cream and cheese, transfer to the slow cooker insert, cover, and refrigerate overnight; in the morning, set the insert into the base and cook as directed, adding 30 minutes or so to the total time if starting from cold.
Creamy potato bake topped with crisp crumbs and served
This 5-ingredient fudgy brownie pie is what I make on the nights when I want something homemade and chocolatey, but my brain is already clocked out from work and kid schedules. It’s basically a rich, gooey brownie baked in a pie dish, so it feels a little more special than a pan of brownies but takes about the same effort. Brownie pie has been around forever in potluck-land here in the Midwest—someone’s aunt always brings one to the church basement or school fundraiser—and it’s loved because it slices like pie but eats like a fudgy brownie. You only need one bowl, a handful of pantry ingredients, and about 10 minutes of hands-on time. It’s the perfect last-minute dessert when you remember at 3 p.m. that you volunteered to “bring something sweet.”
This fudgy brownie pie is fantastic just slightly warm with a scoop of vanilla ice cream—it melts into the cracks and makes it extra gooey. If you’re serving it after a heavier dinner (like pasta or a casserole), keep it simple with just a dusting of powdered sugar and a few fresh berries to lighten things up. For a more dressed-up dessert spread, pair it with coffee or a little espresso, and maybe set out a bowl of whipped cream so everyone can top their own slice. It also travels well, so it’s a great choice for potlucks or game nights; just bake it in a pie dish with a lid or cover it tightly with foil, and you’re good to go.
5-Ingredient Fudgy Brownie Pie
Servings: 8
Ingredients
1/2 cup (1 stick) unsalted butter, melted
1 cup granulated sugar
2 large eggs
1/2 cup unsweetened cocoa powder
1/2 cup all-purpose flour
Optional: pinch of salt and 1 teaspoon vanilla extract (not counted in the 5 core ingredients, but nice to add)
Directions
Preheat your oven to 350°F (175°C). Lightly grease a 9-inch pie dish with butter or nonstick spray.
In a medium mixing bowl, whisk together the melted butter and sugar until well combined and slightly glossy.
Add the eggs one at a time, whisking well after each addition until the mixture is thick and smooth. If using, stir in the vanilla extract and a pinch of salt.
Sift or stir in the cocoa powder and flour. Use a spatula or wooden spoon to gently fold the dry ingredients into the wet ingredients just until no dry streaks remain. The batter will be thick and fudgy—try not to overmix.
Scrape the batter into the prepared pie dish and spread it into an even layer, smoothing the top with your spatula.
Bake for 20–25 minutes, or until the edges are set and a toothpick inserted about 2 inches from the edge comes out with a few moist crumbs (the center should still look slightly soft for a fudgy texture).
Let the brownie pie cool in the dish for at least 15–20 minutes before slicing. It will firm up as it cools. Serve warm or at room temperature, plain or with your favorite toppings.
Variations & Tips
To make this brownie pie your own, you can stir in 1/2–3/4 cup of chocolate chips, chopped nuts, or even crushed pretzels right before baking for extra texture and flavor. If you like things a little more decadent, swirl 2–3 tablespoons of peanut butter or Nutella over the top of the batter with a knife before it goes into the oven. For a slightly less sweet version, reduce the sugar to 3/4 cup and add an extra pinch of salt. If you need to prep ahead, bake the pie the night before, let it cool completely, then cover tightly and store at room temperature; rewarm slices in the microwave for 10–15 seconds to bring back the fudginess. You can also turn this into mini brownie pies by dividing the batter among greased muffin cups and baking for 12–15 minutes—great for portion control and lunchbox treats.
Southern-style fried chicken bites are a cherished staple that brings back fond memories of family gatherings and Sunday suppers. This dish has its roots deep in the heart of Southern cuisine, where fried chicken is more than just a meal; it's a tradition. There's something magical about the crispy, golden-brown coating paired with the tender, juicy chicken inside that makes these bites irresistible. Perfect for any occasion, these chicken bites are sure to become a favorite in your home, just as they have been in mine for decades.
These delightful chicken bites pair wonderfully with classic Southern sides like creamy mashed potatoes, buttery corn on the cob, or a tangy coleslaw. For a touch of sweetness, consider serving them alongside honey-glazed cornbread. A refreshing glass of sweet iced tea or lemonade completes the meal, offering a true taste of Southern hospitality.
Southern-Style Fried Chicken Bites
Servings: 4-6
Ingredients
1.5 pounds boneless, skinless chicken breasts, cut into bite-sized pieces
2 cups buttermilk
2 cups all-purpose flour
1 tablespoon paprika
1 teaspoon garlic powder
1 teaspoon onion powder
1 teaspoon salt
1/2 teaspoon black pepper
1/2 teaspoon cayenne pepper
Vegetable oil, for frying
Directions
Place the chicken pieces in a large bowl and cover with buttermilk. Let them marinate in the refrigerator for at least 1 hour, or overnight for best results.
In a separate bowl, combine the flour, paprika, garlic powder, onion powder, salt, black pepper, and cayenne pepper.
Heat about 2 inches of vegetable oil in a heavy skillet or Dutch oven to 350°F (175°C).
Remove the chicken from the buttermilk, allowing excess to drip off, and dredge each piece in the flour mixture, ensuring a good coating.
Carefully place the chicken bites in the hot oil, frying in batches to avoid overcrowding. Cook each batch for about 5-7 minutes, turning occasionally, until golden brown and cooked through.
Remove the chicken bites with a slotted spoon and place on a wire rack or paper towel-lined plate to drain excess oil.
Serve hot and enjoy the crispy, flavorful goodness!
Variations & Tips
For a spicier kick, add extra cayenne pepper or a dash of hot sauce to the buttermilk marinade. You can also try adding a teaspoon of dried herbs such as thyme or oregano to the flour mixture for an aromatic twist. For a gluten-free version, substitute the all-purpose flour with a gluten-free flour blend. If you prefer a lighter coating, try using panko breadcrumbs instead of flour for a crunchier texture.


.jpg)


